How to make a web app for your own Bluetooth Low Energy device?

Some time ago I assembled unpretentious robot arm for fun and decided to control it with smartphone using Bluetooth. At that time I haven’t experience in native application development yet and I was already familiar with Apache Cordova, but I thought it would be interesting to use Web Bluetooth API, flavoring it by Progressive Web Apps features.
At first glance it may seem there are enough of articles for the keywords: there is a Web Bluetooth specification, a detailed article in the Google Developer blog providing examples, there is a thorough analysis (in Russian) of Bluetooth Low Energy, examples of reverse engineering of the protocols for various BLE devices and even of blinking “smart” bulbs and getting data from fitness wristbands right from the browser — what can go wrong?
I supposed so until I tried to build my own device and to chat with it from the browser. I will not dive deeply, just share my hands-on experience and code, since it would be very useful to me when I started :)
Challenge
So you built a device, decided to equip it with Bluetooth module and to get access to it from the browser. Hereinafter there will be a picture of wiring a Bluetooth module to Arduino Uno, so let it be a device based on Arduino, although, of course, there is no fundamental difference whether you use STM, Raspberry, ESP8266 or anything else. The one thing important is that your controller will work with the Bluetooth module using the UART protocol (read more on Wikipedia).
If you, just like me, have already mounted the good old Bluetooth module HC-05 to your device, uploaded a firmware, launched some of Google examples and can’t understand the browser doesn’t detect your device, then I’m sorry to disappoint you: Web Bluetooth supports only the “Bluetooth 4 standard”.
This is the reason to write this article, because when you, as well as I, will return satisfied from the nearest store with the BLE module blazing (HM-10, for example), you will find that it works quite differently and, what is more important, not supports the Serial Port Profile, by which you are used to carelessly drive bytes back and forth.
Probably you’re familiar with Bluetooth Low Energy concept already, especially with Generic Attribute Profile (GATT), but I’ll try to explain shortly what is important for us now: instead of DIY serial protocol, your device should expose a set of applied “characteristics”, which can be read and/or change by connected device.
Robotic arm for example: it moves in space by three coordinates (X, Y, Z numbers), it can open (0) or close (1) a claw. It means we should configure BLE module to read and write 4 characteristics, which can be discovered, read and overridden with desired values by a connected device.
And it’s great, but here’s the thing: ordinary “hobby” level BLE modules that you’ll meet in the “next store” or on Aliexpress: HM-10, JDY-08, AT-09, some CC41-A that I got, or others — don’t have the ability to configure any services or characteristics.
Instead, they provide only one characteristic that emulates a serial port, and everything you write down there, module will send to your controller via TX, and everything you send from the controller to the module RX, it will send to the connected device. BTW, with a limit of 20 bytes, inherent in any BLE characteristic, by the way.
Thus, despite the fact that Web Bluetooth is limited to using the profile of common attributes, we will actually have to do a serial port profile on top of it for “domestic” use.
Bluetooth Low Energy module configuration
First of all, let’s configure the BLE module, it doesn’t take much time, if you know what to do. It turned out that I had a CC41-A module on the Texas Instruments CC2541 chip, which cost me around 5$ in the “next store”. So an example, I will describe its configuration, but the essence is common for other modules using a similar chip.

If you have a USB-TTL converter, just connect the BLE module to it and you will have direct access to the module from your computer via the COM port. Pay attention to the description of your module, maybe it works with 3.3V logic, in this case you will need to use a voltage level shifter for TX-RX and RX-TX lines. The CC41-A module, despite the fact that “LEVEL:3.3V” is written on it, handles 5V logic.

Instead of using the converter, you can take your controller, implementing the simplest serial bridge: everything you send to one serial port will be transfered to another, and vice versa. In the case of Arduino Uno, you will need to use the SoftwareSerial library:

Start the terminal program (you can use the Serial Monitor from Arduino IDE, I prefer Bray’s Terminal) and connect to the COM port on which the BLE module hangs with the standard settings:
- Baud rate: 9600
- Data bits: 8
- Parity: none
- Stop bits: 1
- Handshaking: none
In standby mode, the module responds to AT commands ending with carriage return and line feed (CR+LF, the “Both NL & CR” option in the Serial Monitor). Some BLE modules work at a different speed by default, for example, at 38400, some modules enter into the configuration mode after pressing a button located on their board, some modules do not require commands to be in uppercase — check your module specifications.
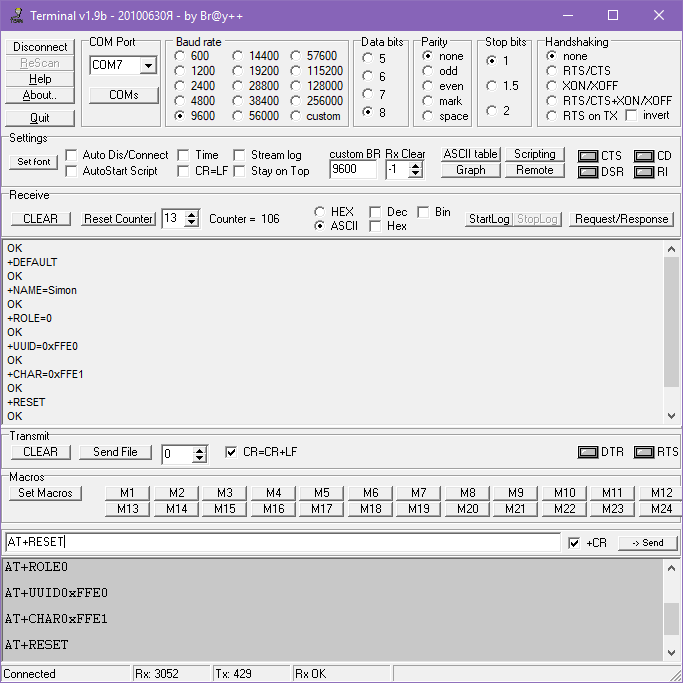
Let’s send the “AT” command to check the connection. The module should respond “OK” — it means everything is OK. In fact, it’s enough to make sure that the module works in the slave mode, waiting for the connection of the master, the UUID of the service is 0xFFE0, and the UUID of the characteristic is set to 0xFFE1 — it will be needed later. Here are some commands that work with my module:
AT— check operability;AT+HELP— output all commands;AT+DEFAULT— reset factory settings;AT+RESET— soft reset;AT+ROLE— output current mode;AT+ROLE0— set slave mode;AT+NAME— output module name;AT+NAMESimon— set module name asSimon;AT+PIN— output PIN code (password) for pairing;AT+PIN123456—set PIN code as123456;AT+UUID— output service UUID;AT+UUID0xFFE0— set service UUID as0xFFE0;AT+CHAR— output characteristic UUD;AT+CHAR0xFFE1— set characteristic UUID as0xFFE1.
Now you can try to connect to the BLE module, for example from the Characteristic Properties Sample page, specifying “0xFFE0” as a service and “0xFFE1” as a characteristic. Or even to send something from the terminal to the browser using the Notifications Sample page.

Building a web app
Warm up is over, now to the interesting part!
Concept
Let’s consider the concept of your device control. You create a UI with a variety of controls that will interact with your device building an ordinary HTML page in the browser.
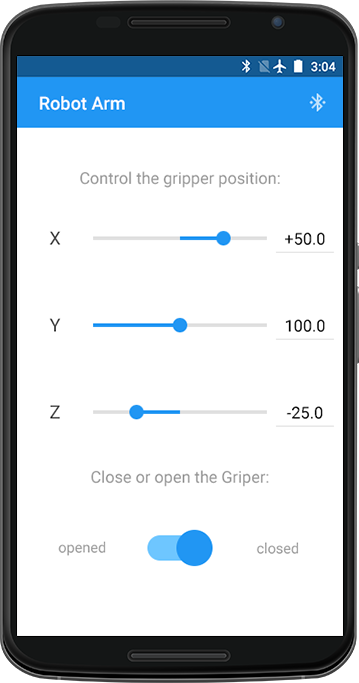
If it’s a robotic arm moving in three coordinates and opening and closing the claw, then it can be three numerical sliders or even a 2D surface, when you click on which the values of X and Y are calculated, one slider for movement along the Z axis and a button, opening or closing the claw. If it’s a kettle, you can make a button “Boil it!”. If it’s a RC car, you can make the “forward”, “backward”, “leftward”, “rightward”, “turn on / off the headlights”, “give a signal” buttons, etc.

Defining the handlers for clicking or changing the states of certain UI elements in JavaScript, you form a message that you send via the Web Bluetooth API to your device. The BLE module receives the message, forwards it to the controller via UART, the controller parses the message, takes the required actions and can send a response or an error as a message back to the BLE module using the same UART, then the module will pass it to the connected device, and you receive a response with the help of JS in the browser.
For example, when you press the claw closure button, the onclick button handler is triggered, which sends the GRIPPER=CLOSE message. The controller receives a message, understands what it’s required to do, closes the claw and sends back the GRIPPER=CLOSED message. Processing this message, we remember the state of the claw in JS and change the text on the button to “Open”.
Objective
Creating an HTML page (UI) and simple work with JavaScript event handlers is not such a complicated matter and there is enough basic knowledge of web technologies. Therefore, I propose to abstract from a specific device and create a terminal application that will connect to your device and exchange messages with it.
Also we’ll implement the logging of the connecting to Bluetooth Low Energy device process, reconnection in case of break of communication and bypass the 20 bytes limitation of the BLE characteristic length.
Well, in the end we’ll turn the usual HTML page into a progressive web application (Google Developers, Wikipedia), which can be installed to the smartphone homescreen and used offline.
Having ability to exchange messages between an HTML page and your device, a stable connection and a simple API, it’s easy to sharpen the application for your needs.
Preparation
Appart of your favorite IDE, you will need a working “device”, which we configured earlier, it’ll help to receive and send messages in real time through the terminal program on the computer for application testing.
Web Bluetooth API is available by default in Chrome 56+ and Opera 43+. The Google Developers article also mentions that in Linux you need to enable chrome://flags/#enable-experimental-web-platform-features flag and restart the browser.
And the last important point: a web app should be served using HTTPS (you can use GitHub Pages) or from the http://localhost — these are security requirements.
UI
App will consist of one index.html page, one styles.css and one main.js file, the latter will contain all the magic.
Let’s make a button to connect to the device, a button to disconect, div-container for messages and a form with a text field and a “Send” button:
Div-container will log connection process, output incoming and outcoming messages in the follow manner:
In order not to guess messages source, let’s divide them by colors:
As you can see, nothing special. The interface is ready :)
Event handlers
Further work will occur in the main.js file.
Let’s get references to UI elements, set up handlers on the connect and disconnect buttons click and on the form submit:
Connecting to the device
Complete connection algorithm consists of several steps:
- Bluetooth device request: the browser starts the search of the nearest device and choose dialog, the user makes a choice, the app code gets the object.
- Connecting to the selected device fom the app code:
a) connection to the GATT server,
b) getting the desired service,
c) getting the desired characteristic. - Enabling the characteristic changes notification — it’s necessary to receive messages from your device.
Arrange in the code:
So we implemented Promises chain representing connection steps in connect() function.
We also defined the deviceCache variable, which will store object of the device selected by the user in order to reconnect to in case of disconnection.
The first line of the connect() function body: if the deviceCache object is nonzero the ternary operator returns a Promise immediately fulfilled, otherwise it accesses to the Bluetooth device request function. Thus, when the “Connect” button is pressed if the user has already connected to the device, the device selection dialog does not appear.
We output error to the terminal with the help of log() function, if it occurs at any step. This function will be implemented later.
Bluetooth device request
In order to request Bluetooth device selection, it’s needed to invoke navigator.bluetooth.requestDevice() with object-configuration as required argument, which describes in what type of Bluetooth devices we interested in. It’s possible to filter by service, by name, it’s possible to request all types of devices, however we still have to specify service we want to work with, otherwise browser will not allow us to access to it.
We are requesting all devices that provide a service with 0xFFE0 UUID, the same as configured in the BLE module. Promise fulfilled with the selected device object, so we cache it and return.
Connecting to the device, getting service and characteristic objects
We perform a simple Promise chain, which speaks for itself. The characteristicCache variable — similar to deviceCache — saves the received characteristic object, it will be required to write data to it, in other words to send a message from the browser to the device.
UUIDs configured in the BLE module used as an argument n getPrimaryService() andgetCharacteristic() functions.
Enabling the characteristic changes notification
It is enough to call the startNotifications() method of the characteristic object, and listen for the characteristic change event after, but more on that later.
Output to the terminal
Let’s implement a function to output to the terminal, to test the connection to the device right now:
We insert a div with the class specified in the type argument to the end of the terminal div-container using the insertAdjacentHTML() method — easy peasy.
Testing
Open the page in the browser, click the “Connect” button, and then the device selection dialog will start. Connect to your device, and the terminal will output messages about the connection process.
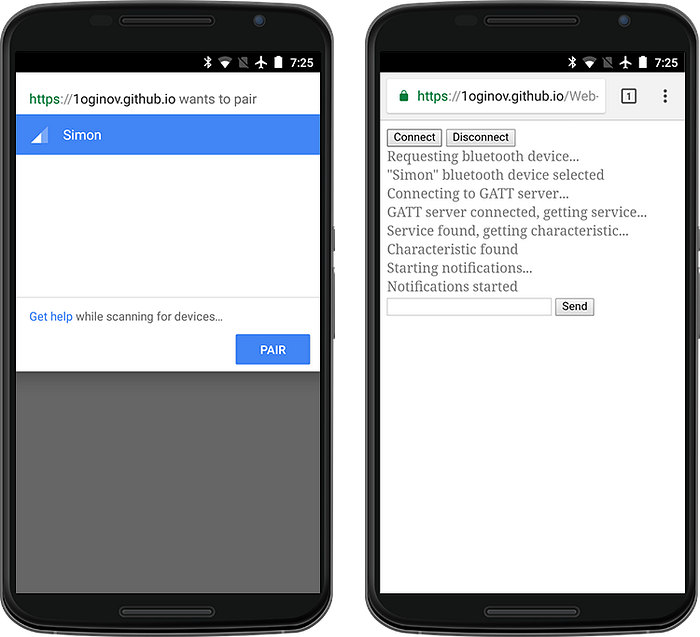
Here I run into a bluetooth connection problem that wasn’t described in the Internet. Service messages output helped diagnose and fix it. The connection can suddenly be lost for no apparent reason, and the browser does not provide its maintenance, that’s why we need to implement the reconnection functionality on our own.
Automatic reconnection
Web Bluetooth offers a gattserverdisconnected event for the device object to track the disconnection. The most actual place to define a listener is in the device selection function:
Now, if you connect to the device and then disconnect it, and the Bluetooth connection will be lost, the browser will try to reconnect once:

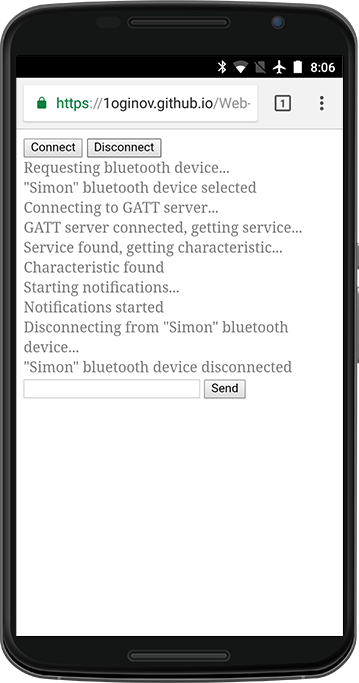
Disconnecting from the device
It’s important not to forget to remove the assigned handler for the gattserverdisconnected event, otherwise the browser will reconnect:
You can not reset the deviceCache, then when you click the “Connect” button, the device selection dialog will not appear, connecting to the previous device instead.
Data receiving
Data is received from the device asynchronously using the notification mechanism that occurs when the value of the BLE characteristic changes. We only need to subscribe to the corresponding characteristicvaluechanged characteristic event. Do this right after notifications turning on. It is also correct to remove the handler from the characteristic when the device is disconnected:
event.target.value — is a DataView object, containing ArrayBuffer, which stores message from your device. Using TextDecoder (MDN), we convert bytes array to the text.

Testing shows that the messages receiving from the device works stably, with CR, LF end of line or without them. Long messages are received completely, but are split by 20 bytes.
Introduction of the intermediate buffer
You may not need to support messages longer than 20 bytes, but for the sake of completeness, let’s go around this limitation. The idea is simple: we’ll write the incoming strings into the intermediate buffer until we’ll get the delimiter character. When the delimiter character is received, we call the third function, passing data from the buffer, and clear the buffer for the subsequent writing.
It’s logical to make the line feed (LF, \n) the delimiter character. It may also be helpful to trim the message:
When creating a web app specific for your device, you can change the receive() function to your own needs, being sure that you are working with the whole message from the device.

Data sending
Sending data to the device is done by writing a value to the characteristic, and more specifically by calling the writeValue() method of the characteristic object with ArrayBuffer as its argument. To convert a string into ArrayBuffer, it’s easiest to use TextEncoder (MDN):
Just in case, the data is converted to a string type using the global String object.
In this implementation, there is the same 20 bytes limitation: anything that goes beyond is simply truncated. Therefore, in case the message is longer than 20 bytes, it’s worth to break it into chunks and send it in sequence with some delay:
To make it easier to process messages on the controller side, add a line feed character (\n) to the end of the message.
The message is split into chunks using a regular expression that correctly handles the carriage return (CR, \r) and line feed (LF, \n) characters. After that the first part is sent immediately, and timeouts are set to send other chunks with a delay of 100 milliseconds.

It woks! So we got a full-featured two-way data exchange with the device and at this point we are done with JS.
Progressive Web App
We don’t know in what conditions your device will be in advance, so it would be nice to be able to work with the created web app offline. And here the concept of Progressive Web Apps (more details on Google Developers or on Wikipedia) will help us: in a nutshell these are websites that look like ordinary or mobile apps for the user. With the use of PWA technologies at the first time you visit the website, you’ll be able to install it as an application on your smartphone’s homescreen and work with it offline.
Icon
The icon is required to install the application to the homescreen. I use realfavicongenerator.net — upload suitable image and the generator will prompt you to adjust the icons for different devices.
In the “Favicon for Android Chrome” section, I recommend to switch to the “Assets” tab and select “Create all documented icons”, otherwise Chrome will generate an icon for the homescreen from the size closest to the desired size, which can vary on different devices.
After finishing the configuration, press the “Generate” button, download the “Favicon package” and unpack it next to the web page. Also copy the code proposed by the generator to the <head>.
Manifest
Together with the icons, the generator has kindly provided us with a manifest boilerplate — manifest.json:
Specify the name of your application in the name property and add the short_name property containing the abbreviated name, no more than 12 characters.
All the generated icons are already listed in the icons array, the app display mode in the display property. standalone means that the web application will be launched without the browser UI elements, which is the most similar to the native application — exactly what is needed.
The browser will color its toolbar in the theme_color color, and background_color will be used as a background for the Splash screen shown on the app launch. Changing the theme_color in the manifest, do not forget to change the meta tag <meta name=”theme-color” content=“#ffffff”> also.
It’s also worth to define the start_url and scope properties equal to ./, to open main page on the application launch firstly, and to constrain the navigation area of the web app with the current and nested pages secondly. The latter can be useful if the application files aren’t located in the root directory of the website.
Service Worker
Service Worker will allow us to cache files necessary for the app and use them offline. Service Worker Toolbox will help us to quickly create our own, just download sw-toolbox.js and companion.js files, place them next to index.html and add the following to the <body> end:
The last thing is to add the sw.js script next to index.html to cache necessary files:
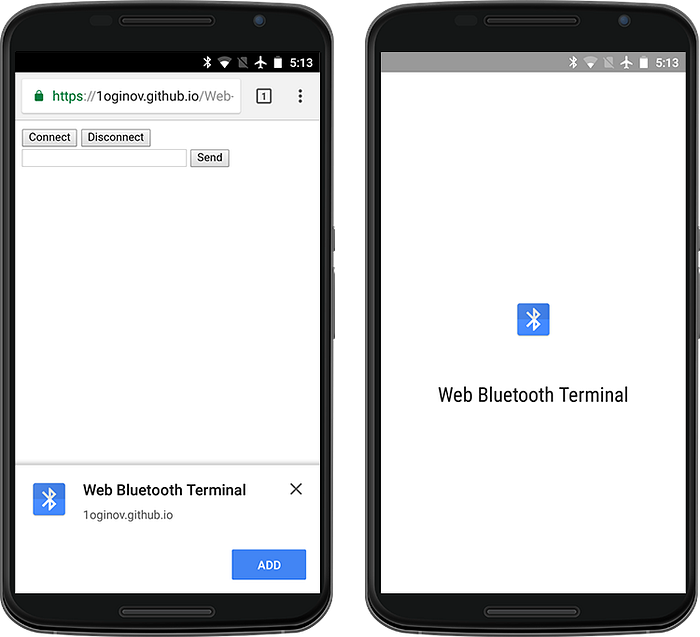
Now we have not just a page, but a real progressive web application:

Epilogue
So that’s how easy and simple to start developing your own Bluetooth Low Energy devices with cheap modules and cross-platform web apps, using a two-way communication channel between the device and the browser.
Now you can change the UI to the specific for your device, add necessary handlers, implement your protocol of communication with the device and… turn on a kettle in the kitchen by pressing button in the app on your smartphone!
Final code of index.html, styles.css, main.js andsw.js files available here.
You can launch modified web terminal here: loginov.rocks/Web-Bluetooth-Terminal — or see how it works on YouTube.
Also you can find advanced ES6 class for serial communication with BLE modules and web terminal repo on GitHub.